remote-exec-server
📖 Table of Contents
- Overview
- Features
- Architecture
- Requirements
- Quick Start
- Installation
- Configuration
- Usage
- Protocol
- Examples
- Security Considerations
- Troubleshooting
- Project Structure
- Limitations
- Future Improvements
- Contributing
- License
Overview
More about me / other projects: abhrankan.netlify.app
Remote Exec Server & Client is a minimal remote command execution framework written entirely with the Python standard library.
The project consists of:
- server.py — receives HTTP requests and executes commands locally.
- client.py — forwards command invocations and standard input to the server.
- BusyBox-style symlink support — one client script can act as many commands depending on the name it is invoked under.
The design is intentionally lightweight, dependency-free, and easy to deploy.
🌱 Project Inspiration
The idea for Remote Exec Server & Client grew out of work on pari-gp-scripts, a collection of scripts for the PARI/GP number theory system.
While developing those scripts, I experimented with:
- Symlink wrappers — one script acting as multiple commands, BusyBox‑style.
- Lightweight tooling — keeping dependencies minimal and relying on the standard library.
- Command forwarding — piping input into
gpand other interpreters for quick execution.
These patterns sparked the realization that the same approach could be generalized: instead of just wrapping gp locally, why not design a framework where one client script can forward commands to a server over HTTP?
Thus, Remote Exec Server & Client was born — a minimal, dependency‑free system for remote command execution, inspired by the simplicity and flexibility of the PARI/GP scripting workflow.
Features
- HTTP-based command forwarding
- Standard input (stdin) forwarding
- Command-line argument support
- Real-time output streaming (chunked transfer encoding) — live progress bars and interactive output display correctly
- Optional command whitelist via
REMOTE_EXEC_ALLOWEDenvironment variable - Optional TLS/HTTPS via
REMOTE_EXEC_TLS_CERT/REMOTE_EXEC_TLS_KEY(server) andREMOTE_EXEC_TLS(client) - BusyBox-style symlink invocation
- Works with any executable installed on the server
- No third-party dependencies
- Cross-platform Python implementation
- Minimal setup and deployment
Architecture
┌─────────────┐
│   Client    │
│  (symlink)  │
└──────┬──────┘
       │ HTTP POST
       ▼
┌─────────────┐
│   Server    │
│ server.py   │
└──────┬──────┘
       │
       ▼
┌─────────────┐
│ subprocess  │
│ execution   │
└─────────────┘
       │
       ▼
┌─────────────┐
│   Output    │
└─────────────┘
Visual Diagram
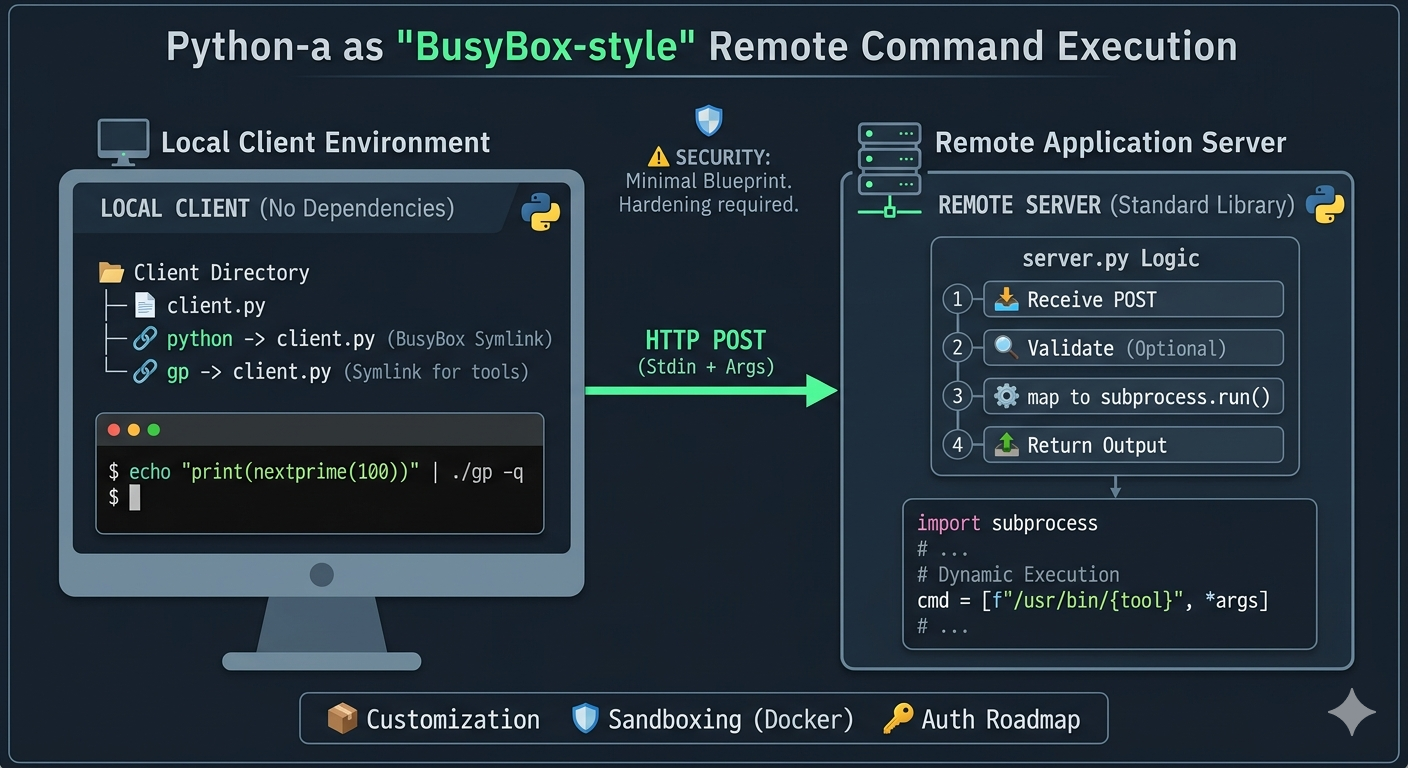
Requirements
- Python 3.8+
- Network connectivity between client and server
No external dependencies are required.
⚡ Quick Start
Start the server:
python server.py
Create a command symlink:
ln -s client.py gp
Execute a remote command:
echo "print(nextprime(100))" | ./gp -q
Installation
Server Setup
Copy server.py to the machine that will execute commands.
Run:
python server.py
Default listening address:
0.0.0.0:8000
Client Setup
Edit the server address:
host = "SERVER_IP:8000"
Make executable:
chmod +x client.py
Place in your PATH:
cp client.py ~/bin/
Create command aliases:
ln -s ~/bin/client.py ~/bin/gp
ln -s ~/bin/client.py ~/bin/python
ln -s ~/bin/client.py ~/bin/node
Each symlink name becomes the command executed remotely.
Configuration
Client
Set the server host:
host = "192.168.56.1:8000"
TLS, built in as of v1.4.0. Set environment variables before running the client:
REMOTE_EXEC_TLS=1 python client.py
For self-signed certificates (typical for local/dev deployments), also skip verification:
REMOTE_EXEC_TLS=1 REMOTE_EXEC_TLS_INSECURE=1 python client.py
REMOTE_EXEC_TLS_INSECURE disables certificate verification entirely — never set it when connecting over an untrusted network, only for local testing with a self-signed cert you generated yourself.
Server
Bind only to localhost:
HTTPServer(("127.0.0.1", 8000), MyHandler)
Change port:
HTTPServer(("0.0.0.0", 9000), MyHandler)
TLS, built in as of v1.4.0. Set REMOTE_EXEC_TLS_CERT and REMOTE_EXEC_TLS_KEY to the paths of a PEM certificate and private key:
REMOTE_EXEC_TLS_CERT=cert.pem REMOTE_EXEC_TLS_KEY=key.pem python server.py
If either is unset, the server runs in plain HTTP (the original default behavior).
Generating a self-signed certificate for local testing:
openssl req -x509 -newkey rsa:2048 -keyout key.pem -out cert.pem -days 365 -nodes -subj "/CN=localhost"
For real deployments, use a certificate from a trusted CA (e.g. Let’s Encrypt) instead of a self-signed one, and omit REMOTE_EXEC_TLS_INSECURE on the client.
Usage
Basic Execution
command_name [arguments]
With Standard Input
echo "input data" | command_name [arguments]
Using Symlinks
ln -s client.py python
ln -s client.py node
ln -s client.py gp
The invoked name determines the command sent to the server.
Protocol
The communication protocol is intentionally simple.
Request
POST /python script.py arg1 arg2 HTTP/1.1
Host: server:8000
Content-Type: text/plain
Request body:
stdin data goes here
Server Processing
cmd_parts = shlex.split(raw_path)
process = subprocess.Popen(cmd_parts, stdin=subprocess.PIPE,
                            stdout=subprocess.PIPE, stderr=subprocess.PIPE)

# stdin is written, and stdout/stderr are read, by three concurrent
# threads -- not sequentially. Writing all of stdin first (before
# anything drains stdout/stderr) deadlocks for any command whose
# input exceeds the OS pipe buffer (~64KB on Linux): the child fills
# its stdout pipe and blocks since nobody's reading yet, stops
# consuming stdin, and the stdin write then blocks too.
threading.Thread(target=write_stdin, args=(process, stdin_data)).start()
threading.Thread(target=read_stream, args=(process.stdout, "")).start()
threading.Thread(target=read_stream, args=(process.stderr, "[stderr] ")).start()
Output is streamed to the client line by line as the subprocess produces it, using HTTP chunked transfer encoding — rather than waiting for the process to exit and sending the full output at once. stdin is written and stdout/stderr are read by three concurrent threads (fixed in v1.5.0 — previously stdin was written in a single blocking call before the stdout/stderr threads started, which deadlocked the entire single-threaded server for any command whose stdin exceeded the OS pipe buffer, roughly 64KB on Linux).
Response
The response uses Transfer-Encoding: chunked. Each line is sent as a separate chunk as soon as it’s produced, so long-running or interactive commands (e.g. progress bars) display in real time on the client rather than appearing all at once at the end.
stdout lines are streamed as-is. stderr lines are streamed live too, prefixed with [stderr] so they’re distinguishable from stdout in the client’s terminal:
stdout line 1
[stderr] warning: something noteworthy
stdout line 2
Both streams are forwarded regardless of the process’s exit code — not just on failure.
Examples
Remote PARI/GP
echo "print(nextprime(100))" | gp -q
Remote Python
echo "print('Hello World')" | python
Remote Node.js
echo "console.log('hello from node')" | node
Pass Arguments
echo "hello" | python script.py arg1 arg2
Security Considerations
This project provides remote command execution capability and should be treated accordingly.
Risks
- Arbitrary command execution
- Remote code execution (RCE)
- Unauthorized access
- Resource exhaustion
- Data exposure
Recommended Protections
Command Whitelisting
Built in as of v1.3.0. Set the REMOTE_EXEC_ALLOWED environment variable to a comma-separated list of allowed command names before starting the server:
REMOTE_EXEC_ALLOWED="gp,python,node" python server.py
If unset or empty, all commands are allowed (the original default behavior) — setting this is strongly recommended for any network-exposed deployment. Disallowed commands receive a 403 Forbidden response.
Network Restrictions
- VPN access only
- SSH tunnels
- Firewall allowlists
- Private networks
Authentication
Implement one or more of:
- API keys
- Bearer tokens
- Mutual TLS
- Basic authentication
Isolation
Run commands:
- Inside Docker containers
- Inside restricted user accounts
- Inside sandboxes
Encryption
Built in as of v1.4.0. Set REMOTE_EXEC_TLS_CERT / REMOTE_EXEC_TLS_KEY on the server and REMOTE_EXEC_TLS=1 on the client — see Configuration. Use HTTPS/TLS whenever traffic crosses an untrusted network; a self-signed certificate is fine for local testing, but use a CA-issued certificate for real deployments.
Troubleshooting
Connection Refused
Verify:
python server.py
Check:
- Server is running
- Correct IP address
- Correct port
- Firewall configuration
Command Not Found
Verify the executable exists:
which python
which node
which gp
Empty Output
Check:
- Server logs
- Whether the command writes to stdout or stderr — both are streamed live and prefixed
[stderr]when applicable - Input handling
Wrong Host
Verify:
host = "SERVER_IP:8000"
Project Structure
.
├── client.py
├── server.py
├── README.md
├── LICENSE
├── CONTRIBUTING.md
└── docs/
    └── diagram.png
Limitations
Current implementation intentionally remains minimal.
- No authentication
- No concurrency (single request handled at a time — a slow or long-running command blocks all other clients until it finishes; this is a known, accepted tradeoff of the minimal design, distinct from the stdin/stdout deadlock bug fixed in v1.5.0, which caused requests to hang indefinitely regardless of this limitation)
- No request validation
- No rate limiting
- No audit logging
- No file transfer support
Future Improvements
- API-key authentication
- Mutual TLS
- Async request handling
- Docker deployment
- Audit logging
- Request signing
- Rate limiting
- File upload/download support
Contributing
Contributions are welcome.
Potential contribution areas:
- Security enhancements
- Protocol improvements
- Testing
- Documentation
- Containerization
- Performance optimization
Feel free to open issues, submit pull requests, or fork the project.
See CONTRIBUTING.md for guidelines on documentation, security, development, and the contribution flow.
License
SPDX-License-Identifier: MIT
This project is licensed under the MIT License — see the repository LICENSE file for the full text:
🔗 See also
- PARI/GP Scripts —
A collection of Bash wrappers for PARI/GP number theory experiments that inspired the design of this project.